

Building Serverless Websites in AWS - Tutorial
Jan 31, 2016
Objective
This tutorial shows how to create a simple serverless application. If you don't know yet what this concept is and its benefits, you can read my previous blog post here. I also explain a little more about each technology that will be used in this example.
The demo app is hosted at http://serverless-demo.zanon.io and the source code is available at https://github.com/zanon-io/aws-serverless-demo
This demo just shows a fake weather information when a button is clicked. To achieve this, we are using the following AWS tools:
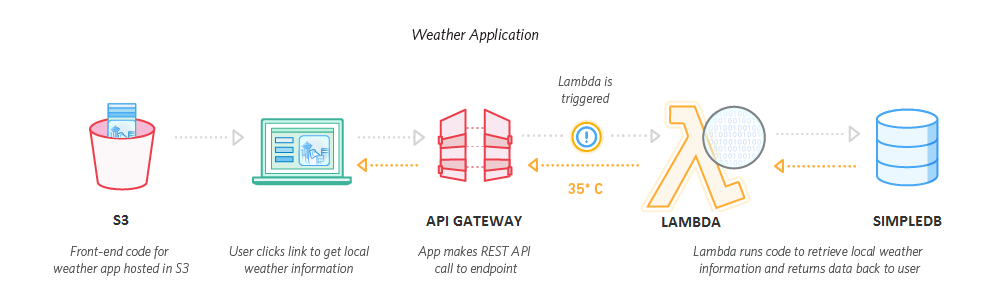
This image was extracted from here and most Serverless demos uses DynamoDB as the database. However, for the sake of respecting the "pay only for what you use", I've decided to use the SimpleDB database. DynamoDB allows you to build more complex apps, but you need to provision capacity and you will pay for it even if no one is using your app. A true serverless aims for infinite scalability, high availability and pay only for what you use.
Summary
This tutorial tries to cover everything to build a serverless site, including how to configure your domain and host your data. If you want to skip this part, just jump for the section that you are interested.
Host your Website
Register a Domain
Buying a domain name is not required for this demo to work. If you browse the Serverless Framework official docs, they say that a domain name is required, but if you type a fake one, it will work the same way for your localhost testing app.
If you want to go beyond testing to make something useful, the first step is to buy a domain with a nice name. As you can see, this is hard! The best ones are already taken.
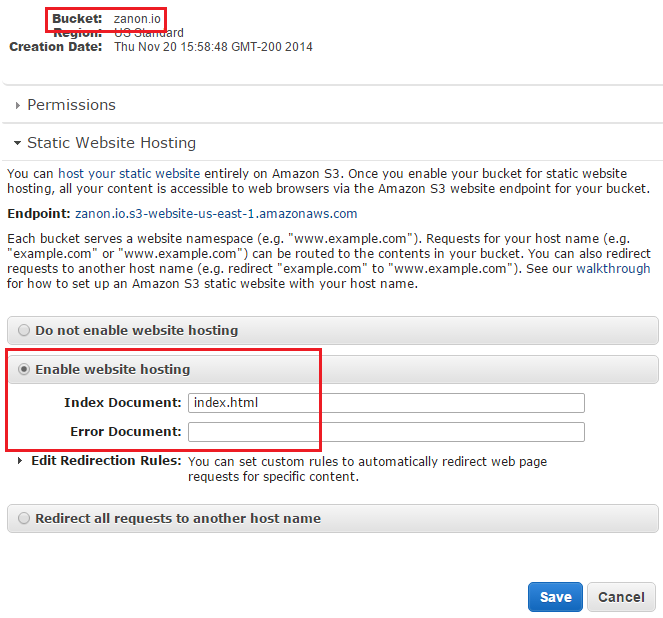
Create Amazon S3 buckets
Amazon S3 buckets is the service where you will manually host your front-end code (HTML/CSS/JavaScript and images) and also where the Serverless Framework will automatically host (in a different bucket) the back-end code.
If you've bought a domain named as example.com, you need to create a bucket with the same example.com name and configure it to enable website hosting.
If you want to support old people that still like to type www for every site, you can also create a bucket with the name www.example.com. For that one, configure it to redirect all requests for the main address.

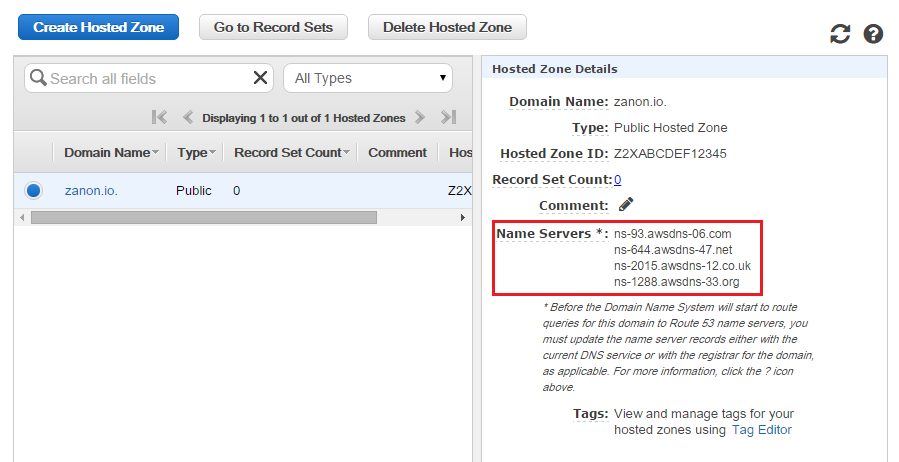
Configure Amazon Route 53 Hosted Zone
After buying your domain, you need to change the default Name Servers. The Name Servers are a set of server addresses (more than one for redundancy) that helps the DNS queries to translate the domain name to the correspondent address of the machine that is hosting your site. Since we want to host our app at Amazon, we need to give them this control. So, the name server will be changed from your domain registrar to Amazon's addresses. The Amazon service that is responsible for this kind of control is the Route 53.
Go to Amazon Route 53 and click to create a Hosted Zone for your domain. After creating it, click at your hosted zone and write down the given Name Server (NS).
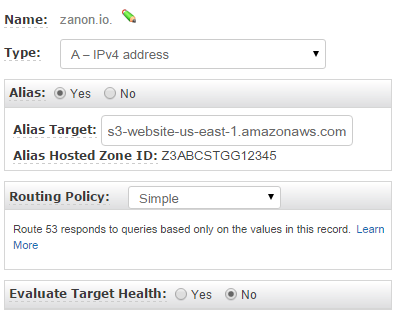
Create Amazon Route 53 Aliases
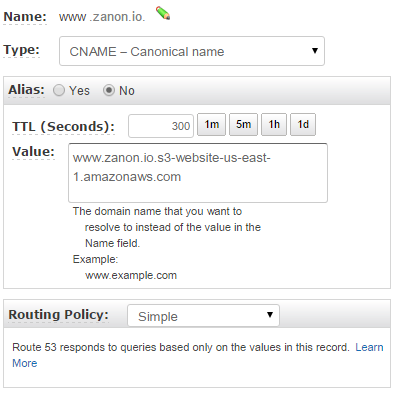
You need to create some aliases to map the incoming Amazon Route 53 requests to your S3 buckets. These aliases are created clicking to Create a Record Set.
You need to create a record set of the A-type for your example.com domain and CNAME-type for your www.example.com domain.
For the A-type record set, just select the S3 bucket within the available options.
Regarding the CNAME-type, you need to provide an address. It should be the bucket endpoint address available at the bucket properties tab.
Changing the Name Servers
After preparing your Amazon Host, you need to give them the domain control accessing your registrar website and changing the name servers configuration.
I've bought my zanon.io domain at GoDaddy.com, so this tutorial uses their control panel to show how to configure your domain. However, since all domain sellers let you change your name server values, the control panels are different, but you need to make the same configuration.
1) Log into your domain registrar's control panel and click to manage your domains.

2) Click at your domain name settings and select the Manage DNS option.

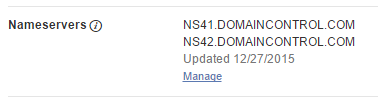
3) View your configured name servers options and edit them with the addresses that are provided by AWS.
Testing
Due to cache, you need to wait some hours until this name server changing takes effect. While you wait, create a simple web page in a file named as index.html and upload it to your example.com bucket. When the cache is refreshed, you can see your webpage up and running typing your domain name.
Front-End
For our demo, we'll create just one file, named as index.html, with a simple button to retrieve the weather info. Nothing fancy. For a real-world website, you would upload all HTML/CSS/JavaScript and images to your S3 bucket and would consider on configuring an Amazon CloudFront instance to serve your files using a CDN (Content Delivery Network) to provide a low latency connection for users throughout the world.
index.html contents:
<div class="container">
  <div class="row">
    <div class="col-md-offset-5 col-md-2 text-center">
      <h3>Daily Weather</h3>
      <input id="btn-show" type="button" class="btn btn-primary" value='Show Current'>
    </div>
  </div>
  <div class="row">
    <div class="col-md-offset-5 col-md-2">
      <p>Value: <span id="weather-value"></span></p>
      <a href="http://zanon.io/posts/building-serverless-websites-in-aws-tutorial"><p>source</p></a>
    </div>
  </div>
</div>
JavaScript code:
$(document).ready(function() {
  $('#btn-show').on('click', function() {
      $.ajax({
        url: "https://vo7lhdeful.execute-api.us-east-1.amazonaws.com/development/weather/local/5",
        success: function(json) {
          $("#weather-value").append(json.value + ' ºC');
        }
      });
  });
});
Our Ajax call is using "https://vo7lhdeful.execute-api.us-east-1.amazonaws.com/development/weather/local/5" as the URL parameter. This is the address that we'll get later, after deploying our app.
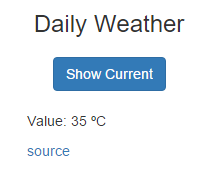
Result:
Serverless Framework
The Serverless Framework is a tool that helps you managing and deploying projects with API Gateway and Lambda Functions. You can do everything manually using Amazon's console, but it'll be hard to manage in big projects.
The Serverless Framework is a Node.js module. So, install it using NPM:
> npm install serverless -g
Creating an IAM User
Serverless needs an AWS user account to execute a CloudFormation script. Since it requires high privileges, you can't simply create an Admin key, with production access, and share it with every developer of your organization. For security measures, for production deployment, you need to generate the Serverless scripts using the flag --noExeCf and execute the output using the CloudFormation UI with a user with secure password (where just a few people have access) and a multi-factor authentication. Read more at the official best practices guide.
However, for a development environment, you can create an Admin account to get it up and running quickly.
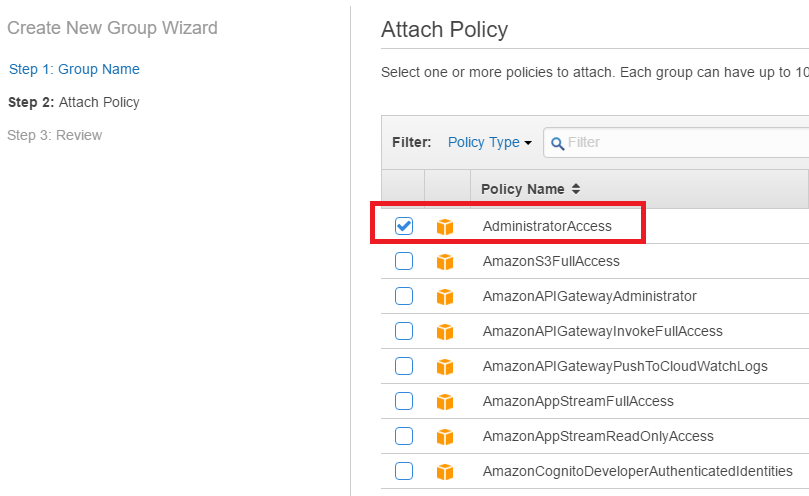
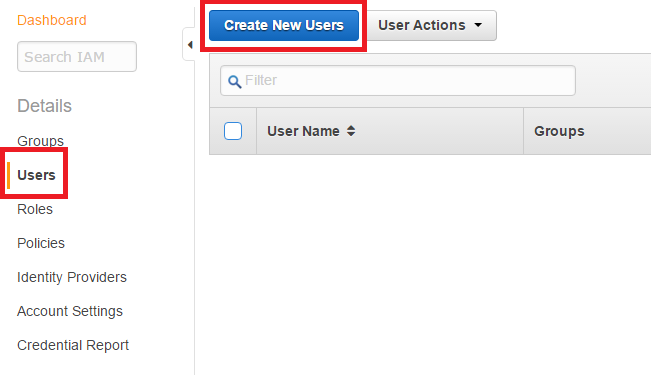
To create an user, browse the IAM console and create a group first:
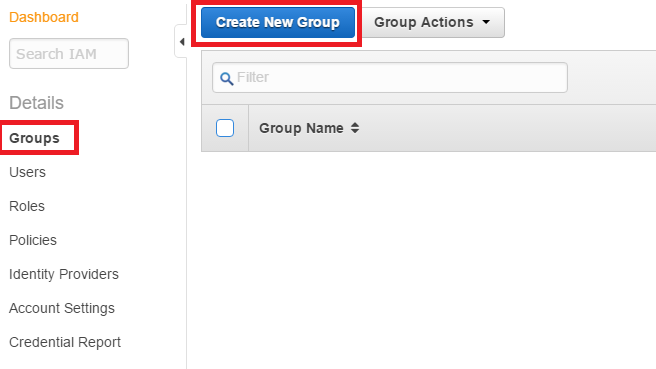
Name it as serverless-group and attach the AdministratorAccess policy.
After that, create a new user named as serverless-admin, write down its Access Key ID and Secret Access Key, and add it to the group that you have created.

Configuring the Serverless User
As Serverless uses the AWS Node.js SDK, it looks for a credentials file to load the access keys. It must be located at ~/.aws/credentials on Mac/Linux or C:\Users\USERNAME.aws\credentials on Windows.
Contents:
[default]
aws_access_key_id = your_access_key
aws_secret_access_key = your_secret_key
Also, you can specify what is your default region with a config file created in the same folder.
Contents:
[default]
region = us-east-1
Note: [default] means the profile name. It must exist, but you can create more profiles with different access keys for different applications.
Creating a Project
Change to the directory where you want to create your project folder and execute:
> serverless project create
It'll ask the following questions:
- Project Name: since they use CloudFormation for deployment and they tokenize resources with
-(dashs), use camelCase to avoid issues. For example, I've named my project as serverlessDemo. - Domain Name: an existing domain is not required. In fact, even if you provide a domain that you own, it'll not make any difference. This name is just what will be used to create a S3 bucket. In my demo, I've selected the name serverless-demo.zanon.io
- E-mail: set the e-mail address where you want to receive CloudFormation alarms.
- Region: the region where your app will be deployed.
- Profile: this profile must exist at your credentials file.
This stage creates a CloudFormation template and a S3 bucket (in my case, named as serverless.us-east-1.serverless-demo.zanon.io) to store the necessary files.
Serverless Architecture
With Serverless, you have the following:
Project
  |__Component
       |__Module
            |__Function
A Component is an element that stores all Modules of a given runtime and code that can be shared between them. Since Lambda supports Node.js, Python and Java, you could create one component for each runtime. Since this example is based on Node.js-only, we'll create just one component named as nodejsComponent.
A Module has the purpose to create a logical Microservice. Every function for a given behavior must be grouped inside the same Module. In our example, it will be named as weather.
A Function is the element where you'll write your code to accomplish a very specific task. In this demo, it was named as local (to get the local weather with an localId).
Creating a Component
Before creating it, change the directory to your project folder:
> cd serverlessDemo
When you execute the command to create a command, it'll ask you to create at least one Module and one Function.
Execute:
> serverless component create
I've named my elements as:
- Component: nodejsComponent
- Module: weather
- Function: local
Implement your Function
To implement your code, open the files handler.js and s-function.json localized at:
Project
  |__nodejsComponent
       |__weather (Module)
            |__local (Function)
                 |__handler.js
                 |__s-function.json
In s-function.json, we have something like:
{
  "name": "local",
  "handler": "weather/local/handler.handler",
  "runtime": "nodejs",
  (...),
  "endpoints": [
    {
      "path": "weather/local/{id}",
      "method": "GET",
      "authorizationType": "none",
      "apiKeyRequired": false,
      "requestParameters": {},
      "requestTemplates": {
        "application/json": "{\"id\": \"$input.params('id') \"}"
      }
      (...)
    }
  ]
}
Change the "path" to:
"path": "weather/local/{id}"
and the "requestTemplates" to:
"requestTemplates": {
  "application/json": "{\"id\": \"$input.params('id') \"}"
}
With this change, we'll be able to retrieve the "id" input parameter.
In handler.js, we have by default:
module.exports.handler = function(event, context) {
  lib.respond(event, function(error, response) {
    return context.done(error, response);
  });
};
Change it to:
module.exports.handler = function(event, context) {
  var result = getWeatherInfo(event);
  lib.respond(event, function(error, response) {
    return context.done(error, result);
  });
};
// that's where you place your Lambda code
function getWeatherInfo(event) {
  return {
    value: "35",
    event: event // input data that I'm ignoring
  }
}
Enable Cross-Origin Resource Sharing (CORS)
Since our API is deployed at the AWS domain and not inside our app domain, the browsers won't process AJAX requests due to security issues. To workaround this, you can use JSONP at the clients-side or enable CORS at Amazon's side. I prefer to enable CORS.
To enable, install the serverless-core-plugin:
> npm install serverless-cors-plugin --save
In s-project.json, replace "plugins" by:
"plugins": [
  "serverless-cors-plugin"
],
In s-function.json, add the cors property to "custom":
"custom": {
  "cors": {
    "allowOrigin": "*",
    "allowHeaders": ["Content-Type", "X-Amz-Date", "Authorization", "X-Api-Key"]
  }
}
Deploy
First, change the directory to your component.
> cd nodejsComponent
Execute the dash deploy command:
> serverless dash deploy
It will show, like in a dashboard, all assets that you have (functions and endpoints). Choose all (pressing ENTER) and hit the deploy option.
After deploying, you'll get a list of URLs where you functions were hosted. For example, mine is available at: https://vo7lhdeful.execute-api.us-east-1.amazonaws.com/development/weather/local
SimpleDB
Initialize your Data
Since there is no AWS Console for SimpleDB, you need to create your model using third-party tools or the AWS SDK. For this demo, I'll simplify and use the Scratchpad web app. To run, download, unzip and host the app in a web server like IIS or Apache Tomcat.
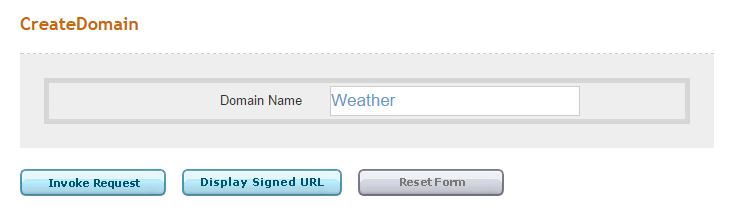
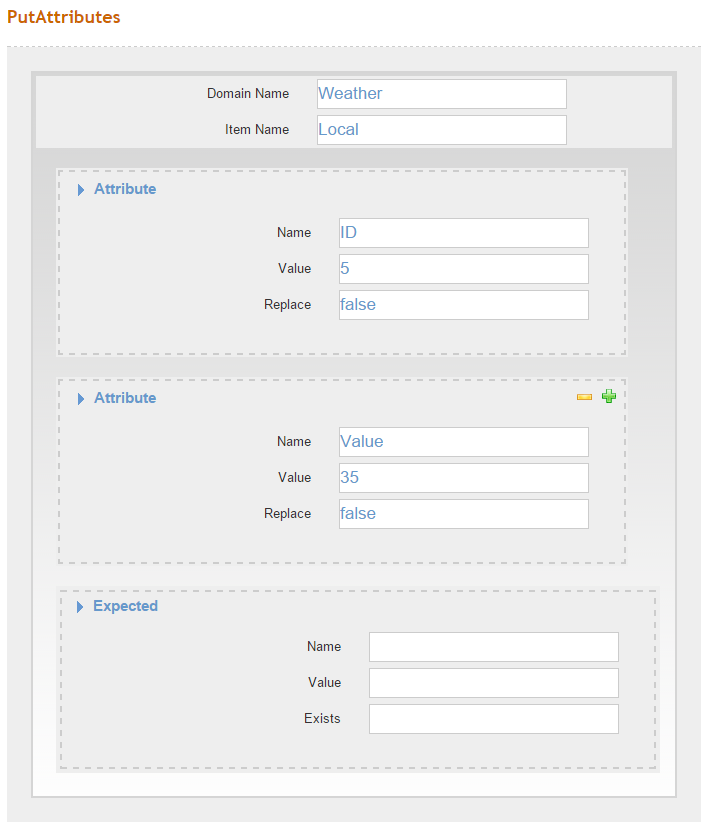
After adding the IAM credentials, call the CreatDomain method to create the equivalent of a table for the relational world and the PutAttributes to add a new record for your domain.
Create Domain:
Put Attributes:
Test:
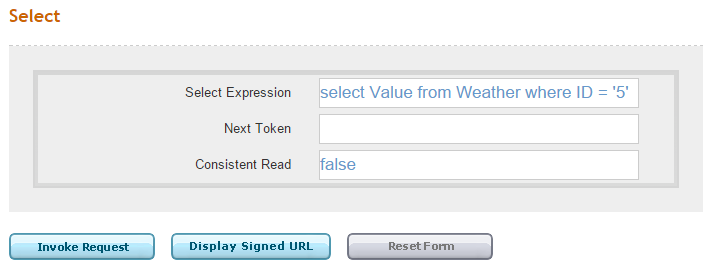
Retrieve the Data using a Lambda functions
As we are using JavaScript, we need to add the Node aws-sdk to our app. Since the code to retrieve data from the database should be reused in many Lambda Functions, we are going to add the aws-sdk reference to our nodejsComponent.
Change the cmd directory to your nodejsComponent folder and execute:
> npm install aws-sdk --save
The module where every Lambda function has access is the Lib file. To modify it, browse the nodejsComponent/lib/index.js
Add the following code:
var AWS = require('aws-sdk');
// Need to add the AWS IAM here, since the Lambda function will need access to connect to the SimpleDB
// Attention to avoid committing this sensitive data by accident
AWS.config.update({accessKeyId: 'accessKeyId', secretAccessKey: 'secretAccessKey'});
module.exports.queryData = function(query, cb) {
  var simpledb = new AWS.SimpleDB();
  var params = {
    SelectExpression: query,
    ConsistentRead: false,
    NextToken: ''
  };
  simpledb.select(params, function(err, data) {
      return cb(err, data);
  });
};
Modify your handler.js with the following:
module.exports.handler = function(event, context) {
  var query = getWeatherQuery(event);
  lib.queryData(query, function(error, response) {
    var result = {
      value: response.Items[0].Attributes[0].Value
    }
    return context.done(error, result);
  });
};
function getWeatherQuery(event) {
  // I'm ignoring the event input since I want to simplify this demo
  // and avoid the need of sanitizing the input to protect from sql injection
  return "select Value from Weather where ID = '5'";
}
And... that's it! The app is working at http://serverless-demo.zanon.io, where the HTML/CSS/JS is hosted on S3, the back-end code is a service that runs only on demand at AWS Lambda and the data is stored in SimpleDB, which generate costs only while processing queries.