


Building Serverless Websites on AWS - Tutorial
JAN 31, 2016
Objective
This tutorial shows how to create a simple serverless application using the Serverless Framework 1.1. This tool supports code written in Node, Python and Java, but this tutorial uses only Node.js.
If you don't know yet what is this concept of Serverless and its benefits, you can read my previous blog post here.
The demo app is hosted at https://serverless-demo.zanon.io and the source code is available at https://github.com/zanon-io/aws-serverless-demo
This demo just shows a fake weather information when a button is clicked. To achieve this, we are using the following architecture:
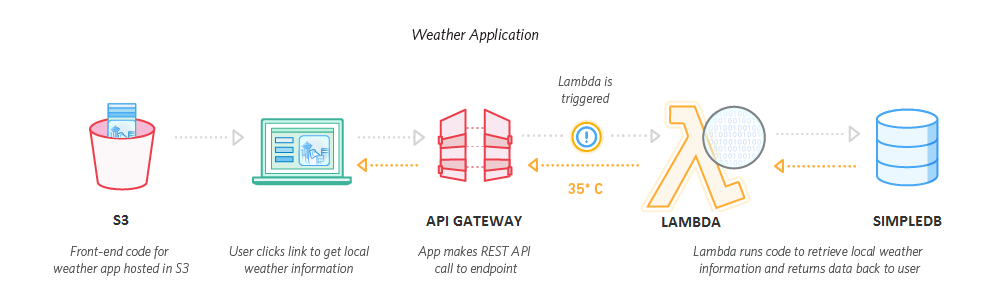
Note: this image was adapted from here. AWS likes to associate Lambda with DynamoDB, but I've used SimpleDB since that's the only serverless database offered by AWS. DynamoDB allows you to build more complex apps, but you need to provision capacity and you will pay for it even if no one is using your app. A true serverless app aims for infinite scalability, high availability and pay only for what you use, so DynamoDB lacks the last one.
Summary
This tutorial tries to cover everything to build a serverless site, including how to configure your domain and host your frontend code.
- Serverless Framework (Backend)
- SimpleDB (Database)
- Host your Website (DNS / S3)
- Frontend (Frontend)
Serverless Framework
The Serverless Framework is a tool that helps you to manage and deploy serverless projects that uses Lambda Functions, API Gateway and other AWS services. You can do everything manually using Amazon's console, but it'll be much harder to manage big projects.
The Serverless Framework is a Node.js module. So, install it using npm (or Yarn, if you prefer):
> npm install serverless -g
In this tutorial, I've used v1.1
Configuring
The Serverless Framework needs an AWS user account to manage your AWS resources. For production usage, this user must be configured with restricted access to just allow the services that will be used. However, if you are just learning, you can create an Admin account to get it up and running quickly.
To create a user, browse the IAM console and create a group first:
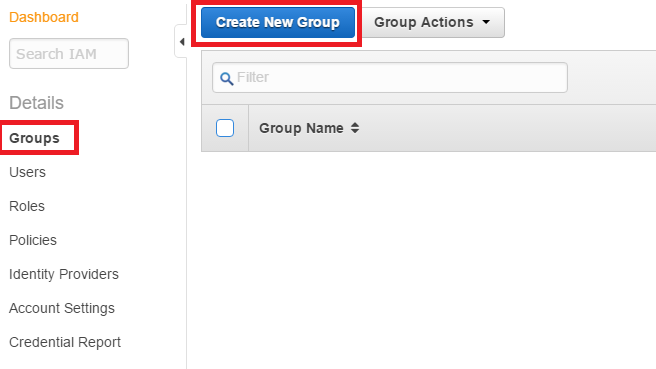
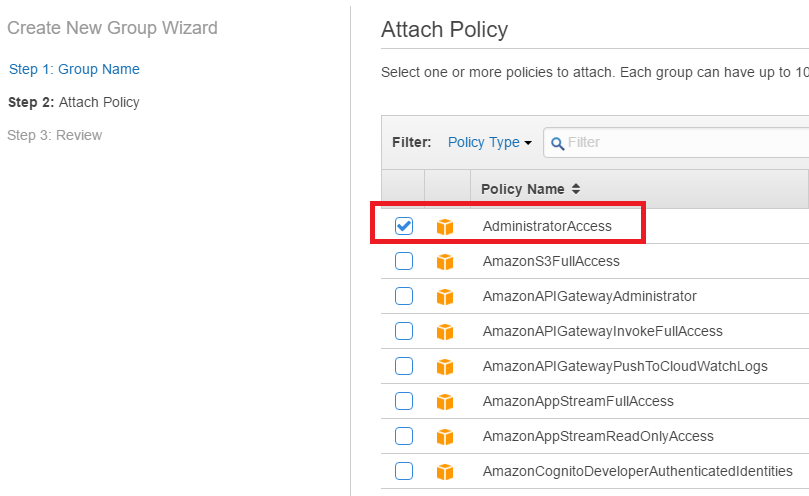
Name it as serverless-group and attach the AdministratorAccess policy.
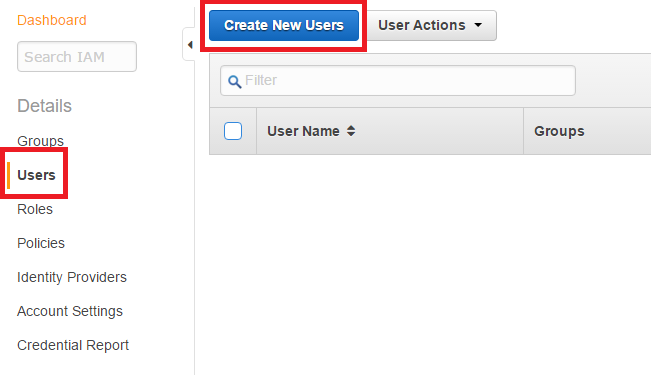
After that, create a new user named as serverless-admin, write down its Access Key ID and Secret Access Key, and add the user to the group that you have created.

As Serverless uses the AWS Node.js SDK, it looks for the user credentials in a credentials file located at ~/.aws/credentials on Mac/Linux or C:\Users\USERNAME\.aws\credentials on Windows.
Note: on Windows, using the file explorer to create a file named .aws returns an error because it starts with a dot. You need to create it with the name .aws. and the file explorer will rename it to .aws.
The file must have the following format: (replace with your access key and secret key)
[default]
aws_access_key_id = your_access_key
aws_secret_access_key = your_secret_key
Creating a Project
Create a folder for your project and execute:
> serverless create --template aws-nodejs --name my-serverless-demo
This command will create 3 files:
- handler.js: the file where we will define our function.
- event.json: it's just a file to help testing. The JSON data will be used as the input data for test invokes.
- serverless.yml: it's our project configuration file.
handler.js
This file is our main function. That's where we'll write our Lambda code to accomplish a very specific task. In this tutorial, we'll create a service that will receive a locationId and read from a database the weather that matches this Id.
In the code below, we are just returning a hard-coded value as the temperature to simplify our first example. Additionally, we are returning the input as the locationId.
module.exports.currentTemperature = (event, context, callback) => {
  const response = {
    statusCode: 200,
    body: JSON.stringify({
      temperature: 30,
      locationId: event.id
    })
  };
  callback(null, response);
};
event.json
Below follows an example of the file event.json. It is useful for testing as it can be used to replace our event input parameter.
{
  "id": 5,
  "name": "Rio de Janeiro"
}
serverless.yml
This configuration file uses the YAML syntax that is very easy to use and readable. For our hello-world example, we can replace the file contents with the following:
service: my-serverless-demo
provider:
  name: aws
  runtime: nodejs4.3
functions:
  weather:
    handler: handler.currentTemperature
In this configuration, we have just one function, named as weather, that will be defined by a handler.js module that exports a currentTemperature function.
Deploying
Deploying is an easy task. Just run:
> serverless deploy
We have just deployed our function, but there is yet no public address to trigger it.
Invoking
We can test our Lambda function running the following:
> serverless invoke --function weather --path event.json
event.json is our input test file.
Endpoints
An endpoint is our RESTful interface implemented by the API Gateway which provides a public URL for our Lambda functions.
To create an endpoint, we need to add HTTP events to our serverless.yml file. See this example:
service: my-serverless-demo
provider:
  name: aws
  runtime: nodejs4.3
functions:
  weather:
    handler: handler.currentTemperature
    events:
      - http: GET weather/temperature
After modifying, deploy it again with serverless deploy.
Now our function is accessible from a public URL. In this test, I've got the following address: https://8w8ctjxkeh.execute-api.us-east-1.amazonaws.com/dev/weather/temperature
You can copy-paste your URL into your browser address to execute a GET request. You may receive the following JSON result:
{
  "temperature": 30
}
Did you miss the locationId property? As we are not passing parameters, event.id is undefined and the JSON object will omit the locationId property.
However, even if we use querystring parameters (adding ?id=5) to the end of the URL, we still won't see the locationId property. The reason is that the event object that the Lambda function receives is not exactly what we pass to API gateway. The querystring parameters will be available under the queryStringParameters property.
See the following Lambda function. In this example, it will be able to access the input variables and access the id property from a ?id=5 querystring.
module.exports.currentTemperature = (event, context, callback) => {
  const response = {
    statusCode: 200,
    body: JSON.stringify({
      temperature: 30,
      locationId: event.queryStringParameters.id
    })
  };
  callback(null, response);
};
Note: if you are using a POST/PUT/DELETE verb, parameters will be available under the body property and you need to parse it before using (example: JSON.parse(event.body)).
Setting Lambda limits
By default, your Lambda functions will be created with a reserved memory size of 1024 MB of RAM and a timeout setting of 6 seconds. You can change those values in the serverless.yml file.
functions:
  weather:
    handler: handler.currentTemperature
    events:
      - http: GET weather/temperature
    memorySize: 128
    timeout: 10
Serverless Architecture
Serverless fits well in a microservices architecture. In this architecture, each endpoint triggers just a single function that is responsible for a specific task. For example, if we added another function to retrieve the average temperature for a given interval, we would configure the serverless.yml as the following:
service: my-serverless-demo
provider:
  name: aws
  runtime: nodejs4.3
functions:
  weatherCurrent:
    handler: handler.currentTemperature
    events:
      - http: GET weather/current
  weatherAverage:
    handler: handler.averageTemperature
    events:
      - http: GET weather/average
In a Monolithic architecture, we would have just one big function that would handle all kind of requests.
service: my-serverless-demo
provider:
  name: aws
  runtime: nodejs4.3
functions:
  weather:
    handler: handler.temperature
    events:
      - http: GET weather/current
      - http: GET weather/average
You can read more about serverless architectures in this post.
Enable Cross-Origin Resource Sharing (CORS)
Since our API is deployed at the AWS domain and not inside our app domain, the browsers won't process AJAX requests due to security issues. To workaround this, you can use JSONP or enable CORS at Amazon's side. I prefer to enable CORS.
It's simple. You just need to set CORS headers inside your Lambda function.
module.exports.currentTemperature = (event, context, callback) => {
  const response = {
    statusCode: 200,
    headers: {
      'Access-Control-Allow-Origin': '*'
    },
    body: JSON.stringify({
      temperature: 30,
      locationId: event.queryStringParameters || event.queryStringParameters.id
    })
  };
  callback(null, response);
};
SimpleDB
We have already configured and deployed our backend code. Let's make it more useful integrating it with SimpleDB, which is a serverless database.
Initialize your Data
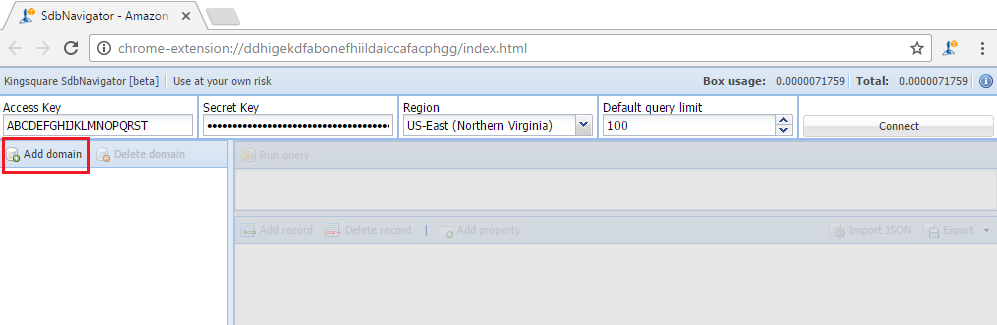
Since there is no AWS Console for SimpleDB, you need to create your model using third-party tools or the AWS SDK. I like the SdbNavigator Chrome Extension. It's available here.
To connect, you need to set your AWS credentials (restrict access to SimpleDB only) and select a Region.
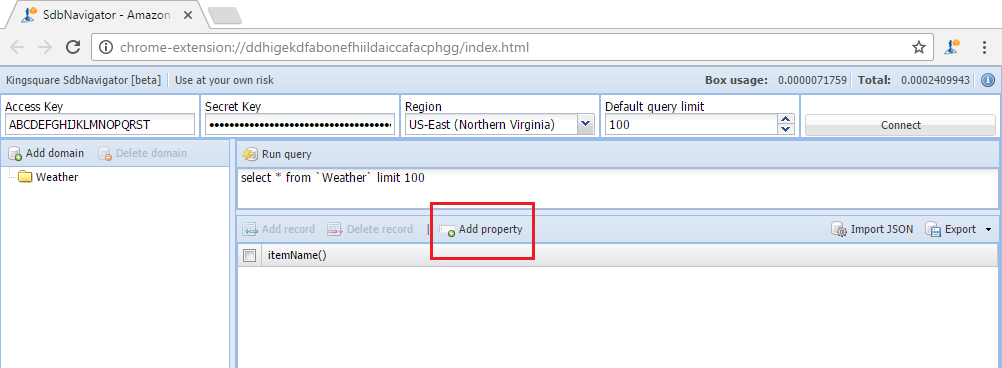
Click on "Add domain" and type "Weather" as the name. The domain is the equivalent of a table in the relational world.
Click on "Add property" and add one property with the name "Value" and another with the name "ID".
Now click on "Add record" to add a register with value 35 and ID 5.
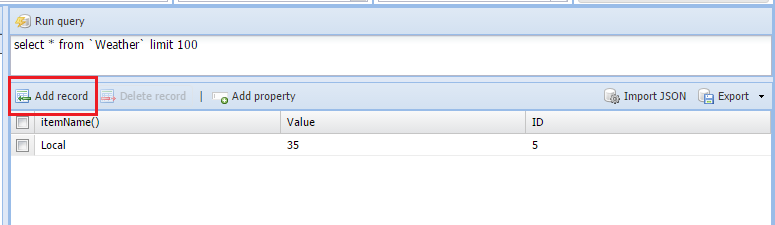
As you may note, SimpleDB accepts only string fields which means that it is not suitable for complex data or aggregations.
Add permissions to your Lambda functions to read SimpleDB data
Lambda functions don't have access to AWS resources by default. You need to give explicitly access through iamRoleStatements in the serverless.yml file.
service: my-serverless-demo
provider:
  name: aws
  runtime: nodejs4.3
  region: us-east-1
  iamRoleStatements:
      - Effect: "Allow"
        Action:
          - 'sdb:Select'
        Resource: "arn:aws:sdb:${self:provider.region}:*:domain/Weather"
functions:
  weather:
    handler: handler.currentTemperature
    events:
      - http: GET weather/temperature
    memorySize: 128
    timeout: 10
Retrieve SimpleDB data using a Lambda function
As we are going to use the aws-sdk, it is already available for our Lambda functions without needing to install it locally. If you need to use another module, just npm-install and the Serverless Framework will zip the package with the node_modules.
Let's go back to our handle.js function and rewrite it to the following:
var AWS = require('aws-sdk');
// function that helps making queries
const queryData = (query, callback) => {
  const simpledb = new AWS.SimpleDB();
  simpledb.select({ SelectExpression: query }, callback);
};
// query temperature
const buildTemperatureQuery = (input) => {
  // sanitize the input confirming that it's a number
  const locationId = Number(input);
  return `select Value from Weather where ID = '${locationId}'`;
};
module.exports.currentTemperature = (event, context, callback) => {
  const param = event.queryStringParameters;
  const input = param ? param.id : 0;
  const query = buildTemperatureQuery(input);
  queryData(query, (err, resp) => {
    const response = {
      statusCode: 200,
      headers: {
        'Access-Control-Allow-Origin': '*'
      },
      body: JSON.stringify({
        temperature: resp.Items ? resp.Items[0].Attributes[0].Value : null,
        locationId: param ? param.id : undefined
      })
    };
    callback(err, response);
  });
};
Deploy and test the modified code.
Host your Website
Register a Domain
Buying a domain name is not required for this demo to work. If you want to go beyond testing to make something useful, the first step is to buy a domain with a nice name. As you can see, this is hard! The best ones are already taken.
Create Amazon S3 buckets
Amazon S3 buckets is the service where you will manually host your frontend code (HTML/CSS/JavaScript and images) and also where the Serverless Framework will automatically host (in a different bucket) the backend code.
If you've bought a domain named as example.com, you need to create a bucket with the same example.com name and configure it to enable website hosting.
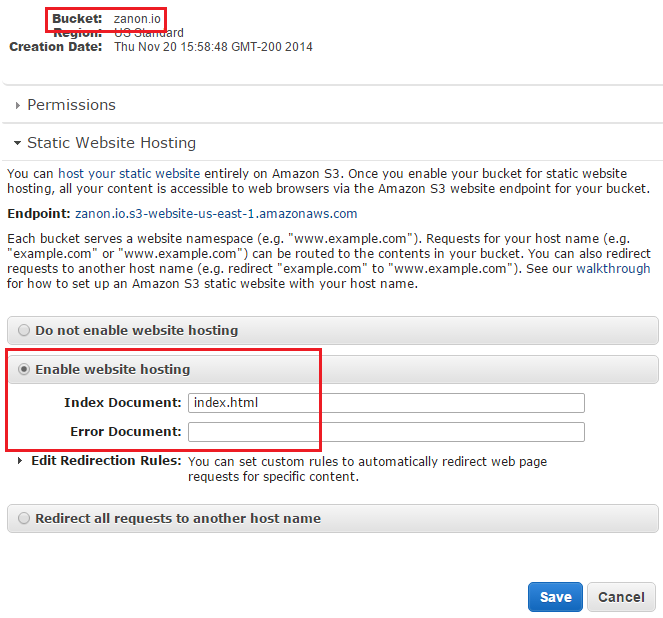
If you want to support old people that still like to type www for every site, you can also create a bucket with the name www.example.com. For that one, configure it to redirect all requests for the main address.

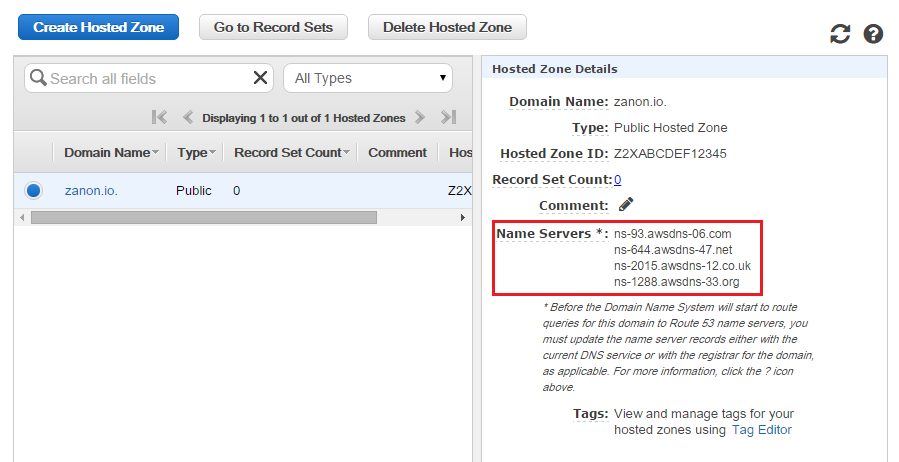
Configure Amazon Route 53 Hosted Zone
After buying your domain, you need to change the default Name Servers. The Name Servers are a set of server addresses (more than one for redundancy) that helps the DNS queries to translate the domain name to the correspondent address of the machine that is hosting your site. Since we want to host our app on Amazon, we need to give them this control. So, the name server will be changed from your domain registrar to Amazon's addresses. The Amazon service that is responsible for this kind of control is the Route 53.
Go to Amazon Route 53 and click to create a Hosted Zone for your domain. After creating it, click at your hosted zone and write down the given Name Server (NS).
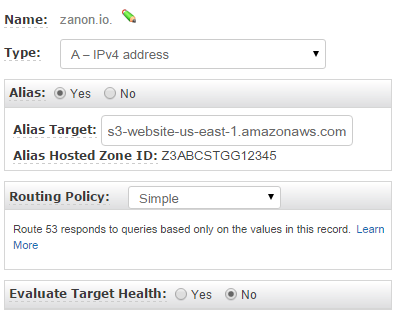
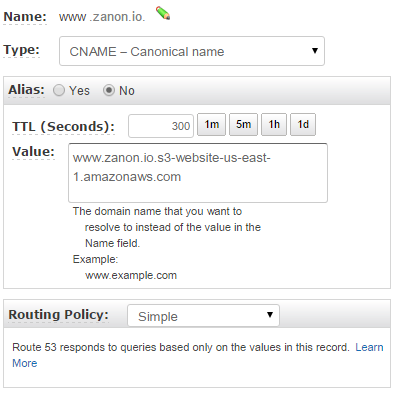
Create Amazon Route 53 Aliases
You need to create some aliases to map the incoming Amazon Route 53 requests to your S3 buckets. These aliases are created clicking to Create a Record Set.
You need to create a record set of the A-type for your example.com domain and CNAME-type for your www.example.com domain.
For the A-type record set, just select the S3 bucket within the available options.
Regarding the CNAME-type, you need to provide an address. It should be the bucket endpoint address available at the bucket properties tab.
Changing the Name Servers
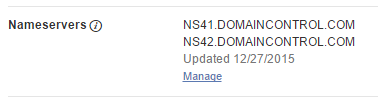
After preparing your Amazon Host, you need to give them the domain control accessing your registrar website and changing the name servers configuration.
I've bought my zanon.io domain at GoDaddy.com, so this tutorial uses their control panel to show how to configure your domain. However, since all domain sellers let you change your name server values, the control panels are different, but you need to make the same configuration.
1) Log into your domain registrar's control panel and click to manage your domains.

2) Click at your domain name settings and select the Manage DNS option.

3) View your configured name servers options and edit them with the addresses that are provided by AWS.
Testing
Due to cache, you need to wait some hours until this name server changing takes effect. While you wait, create a simple web page in a file named as index.html and upload it to your example.com bucket. When the cache is refreshed, you can see your webpage up and running typing your domain name.
Frontend
For our demo, we'll create just one file, named as index.html, with a simple button to retrieve the weather info. Nothing fancy. For a real-world website, you would upload all HTML/CSS/JavaScript and images to your S3 bucket.
index.html contents:
<div class="container">
  <div class="row">
    <div class="col-md-offset-5 col-md-2 text-center">
      <h3>Daily Weather</h3>
      <input id="btn-show" type="button" class="btn btn-primary" value='Show Current'>
    </div>
  </div>
  <div class="row">
    <div class="col-md-offset-5 col-md-2">
      <p>Value: <span id="weather-value"></span></p>
      <a href="https://zanon.io/posts/building-serverless-websites-on-aws-tutorial"><p>source</p></a>
    </div>
  </div>
</div>
JavaScript code:
$(document).ready(function() {
  $('#btn-show').on('click', function() {
      $.ajax({
        url: "https://8w8ctjxkeh.execute-api.us-east-1.amazonaws.com/dev/weather/temperature?id=5",
        success: function(json) {
          $("#weather-value").text(json.temperature + ' ºC').fadeOut('slow').fadeIn('slow');
        }
      });
  });
});
Our Ajax call is using https://8w8ctjxkeh.execute-api.us-east-1.amazonaws.com/dev/weather/temperature?id=5 as the URL parameter. This is the address of our Lambda function that we have deployed early.
Result:
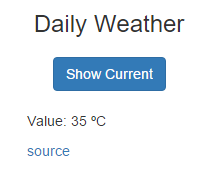
And... that's it! The app is working at https://serverless-demo.zanon.io, where the HTML/CSS/JS is hosted on S3, the backend code is a service that runs only on demand with AWS Lambda and the data is stored in SimpleDB, which generate costs only while processing queries.
UPDATE: Aug 06, 2016
Updated the tutorial due to changes on the Serverless Framework (v0.2 => v0.5)
UPDATE: Nov 04, 2016
Updating the Serverless Framework code (v0.5 => v1.1)
UPDATE: Mar 25, 2017
If you want to know more, I've found a nice website that may help you to go deeper into this subject: http://serverless-stack.com. It offers a detailed guide and a nice demo using Lambda, API Gateway, Cognito and DynamoDB.